 Tweet
Tweet
This thread contains lots of pics, tips, and tricks for smoking a great brisket. Take your time to explore it. However, I use this OP to publish my current technique. See below. I will update this from time to time.
LAST UPDATE: 9/21/15
=============================
This document describes my current technique for cooking brisket. I use the same basic method on both my Traeger wood pellet smoker and my Stumps gravity feed charcoal/wood chunk smoker. I am continually learning and tweaking my technique, but the basic method described below is pretty solid and results in consistently good smoked brisket. Brisket can be difficult to cook correctly and are often considered the most challenging cut among the typical bbq meats (pork butt, ribs, chicken, brisket), but it can be mastered and the results are wonderful.
Step 1 - Selection
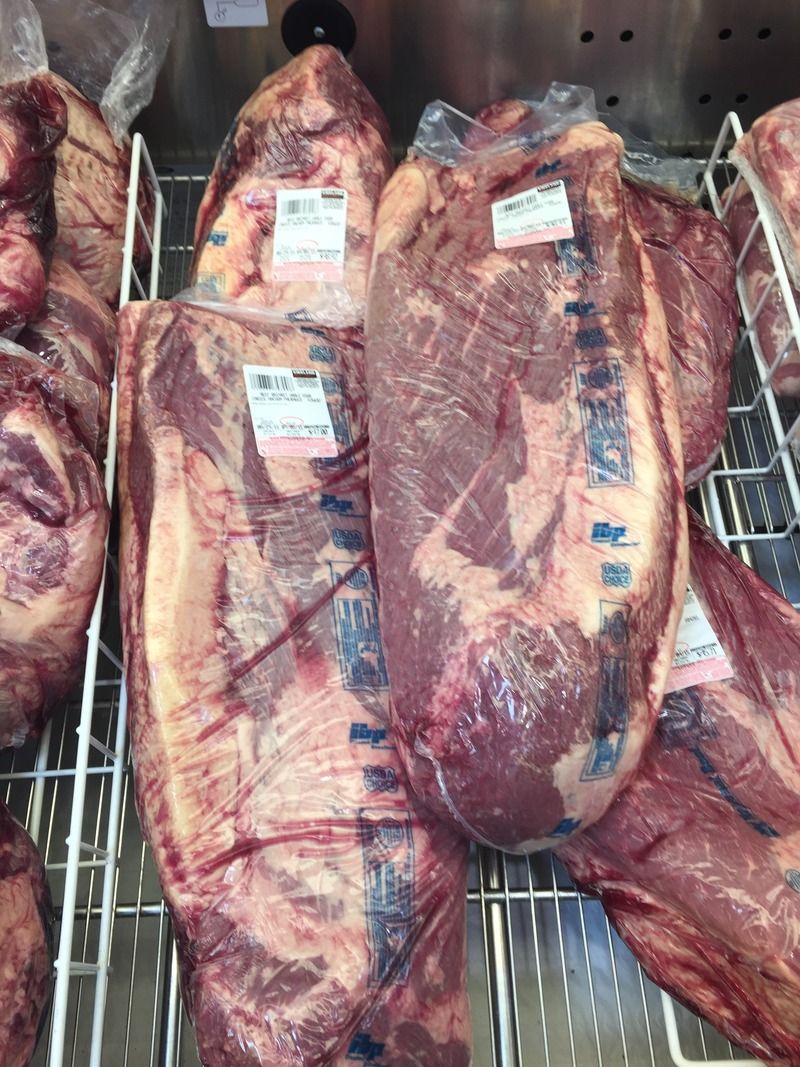
First of all, you need to locate a good brisket. Some places sell only part of the brisket. A complete brisket is called a "packer". The narrower but thicker end is called the "point" and the thinner but broader end is called the "flat". The flat is more lean and the point is more fatty. At many places when you buy a brisket, you are only buying the flat. This happens quite a bit at Costco for example. I strongly recommend buying and cooking a complete packer. Without the full packer it is tough to keep the brisket moist. Dry tough briskets are no fun and are exactly what we are trying to avoid. If you buy a brisket that is less then 10 lbs, you probably have just the flat. A typical packer brisket is 12-17 lbs. Costco briskets:
It should also be noted that a brisket consists of two muscles. The main muscle is called the "flat". The other muscle is on top of the flat is the "point", and the fibers run at 90 degrees from the other muscle.
A common technique in brisket is to separate the point from the flat once the brisket is completely cooked and slice the flat, but cut the point into cubes which are then given some bbq sauce and some extra seasoning and thrown back on the grill to make "burnt ends". These little nuggets are awesome, but I generally leave everything together and just slice and serve the flat and point together. In my experience, the best part of the brisket in terms of flavor and tenderness is the combined flat and point on the end containing the point.
One additional thing to note about brisket is that there is a fatty side and a meaty side. I usually trim the fatty side down to about 1/4 inch of fat, but trim all of the fat and silver skin off the meaty side. The meaty side is where you are going to get most of your smoke penetration. Smoke does not penetrate fat. I like to leave the fat on the other side because if you trim both sides, you are likely to end up with a dry product.
When you pick out a brisket, try to get something with good marbling. If you can afford it, try a prime or wagyu brisket, but you can get excellent results with a good quality USDA Choice. You can buy full packers at Walmart, Sam's, Costco, and just about any butcher shop. They have two butcher shops in Lehi and there are several in Salt Lake Valley. There is a new meat distributor in Orem/Lindon called "Sunbow" and I hear they have good brisket.
Step 2 - Preparation
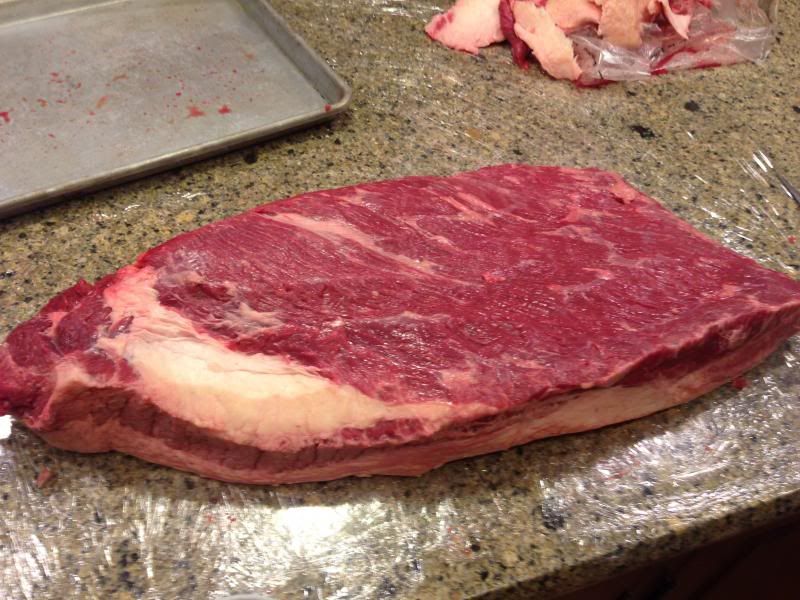
Next step is to prep the brisket. Here is a 16 lb brisket I did last year. Point on the left, flat on the right. Fat side is up.
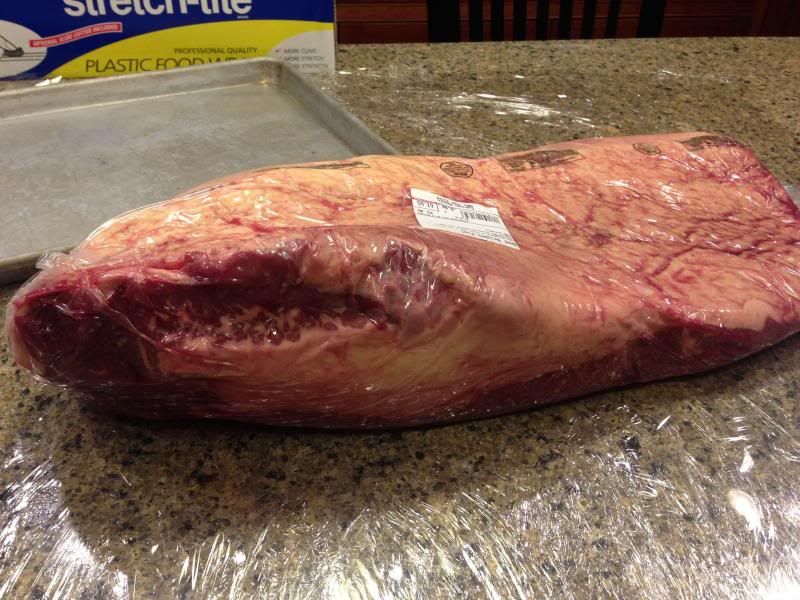
First of all, there is a wedge of fat on the side between the flat and the point. It is not essential to do so, but I like to cut it out. This makes the thickness of the two sides more uniform and makes the meat cook more evenly. This one could have used a little more cutting (note the remaining fat at the top of the wedge).
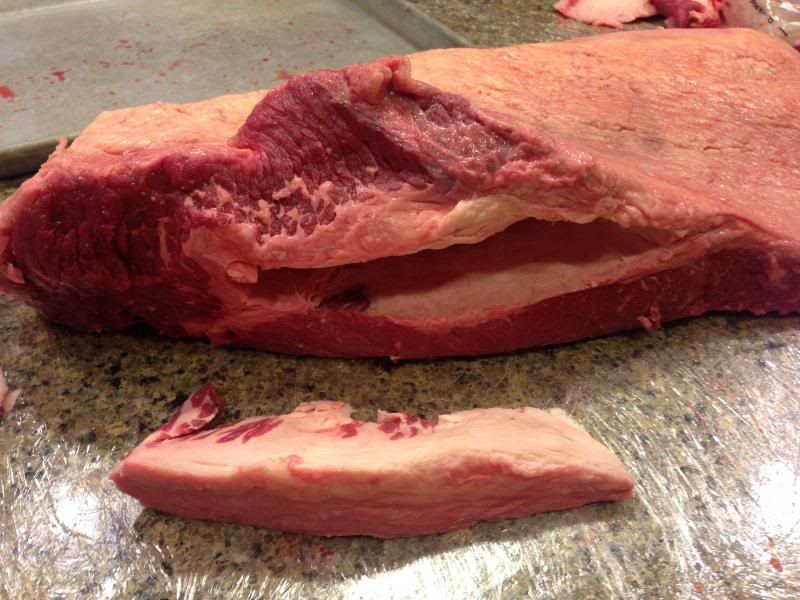
Depending on the brisket, sometimes I will trim some fat away on the point end in an attempt to make the brisket more uniform in thickness. Trim away excess fat until you have about 1/4" fat on the fatty side.
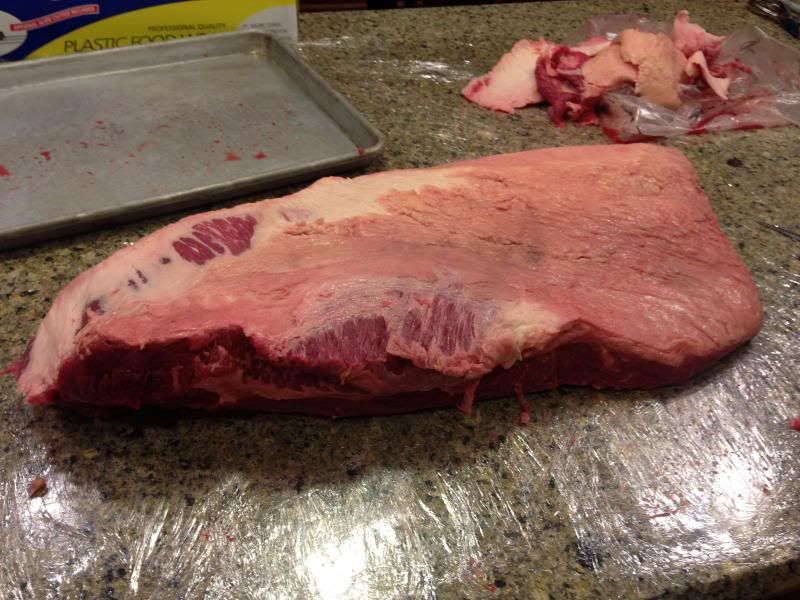
Next I flip the brisket over and trim all of the silver skin and fat from the meaty side. When you are done it looks like this:
At this point you may want to consider injecting the brisket. This is an OPTIONAL step. You can get good results without injecting, but some argue that it gives you more consistent results over time. You can look up injection recipes on the web or you can use a mix (just add water). You can purchase injection mixes online or buy them from BBQ Pitstop in Lehi. One of the ingredients in an injection is phosphates, which help the meat retain moisture. You also need an injection needle which you can pick up at BBQ Pitstop for a few bucks. After injecting you should massage the brisket and wrap it up and let it sit in the fridge for an hour or two for the injection to absorb. Go ahead and try it, but I don't inject much anymore as I think it generally turns out fine without it.
After injecting (or not), the next step is to apply your rub. For brisket, I like to use a rub that is specifically designed for beef. A beef rub will be heavy on salt and savory flavors and not have so much sugar. Sugar is great for pork, but not for beef. My favorite brisket rub is called "Black Ops" and you can pick it up at BBQ Pitstop in Lehi or order online. I have also had good results with Plowboys Bovine rub. Or you can keep things simple and use a 50/50 mix of kosher salt and black pepper. This is what the famous BBQ chef Aaron Franklin does.
Before you apply the rub, be sure to wipe off all of the injection if necessary. Some people like to apply yellow mustard or olive oil to a brisket prior to rubbing to give the rub something to stick to. Sometimes I do this, sometimes I don't. Apply a liberal amount of rub to both sides (you can use less rub than this if you like).
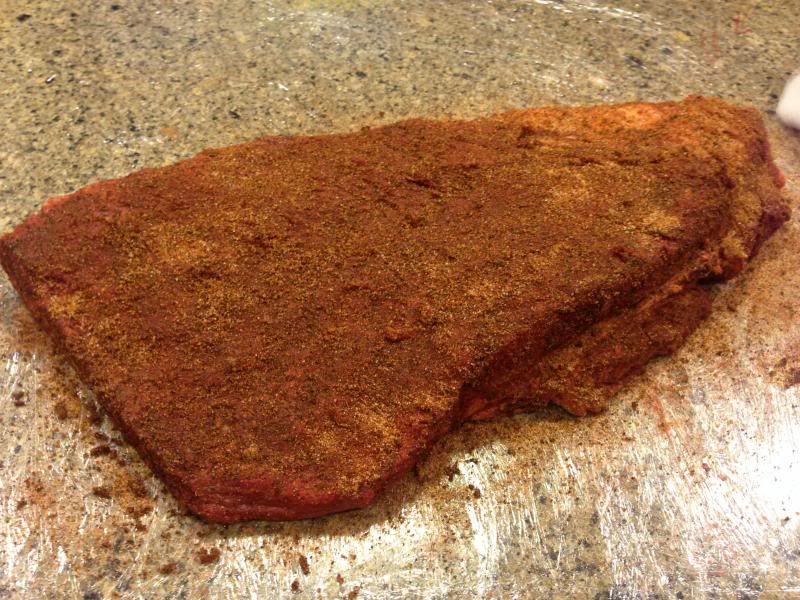
At this point you can wrap the brisket in plastic wrap and throw it back in the fridge until you are ready to cook. But you can apply rub right before smoker. Leaving rub on too long may cause water to shed due to salt in the rub.
Step 3 - Smoker
The next step is to fire up the smoker and cook the brisket. There are two main strategies for cooking brisket: "low and slow" vs. "hot and fast". The following technique is more of a low and slow method. You should start cooking the brisket about 12-14 hours before you plan on eating. This will give your brisket plenty of time to cook and then rest prior to serving. You don't want all your guests to show up and learn that the meat won't be done for 2-3 hours.
I strongly recommend using OAK pellets or wood chunks (depending on your smoker type). If you don't have oak, hickory or something else would probably work OK. I am partial to oak because that is what they used in Austin - THE BRISKET CAPITAL OF THE WORLD.
Turn your brisket on to 225 degrees. Cook for about 4-5 hours. You can place the brisket fat-side down or fat side up. There are two schools of thought on this. Some think that having fat-side up results in a juicier brisket, but I think someone debunked this (no diff). Fat-side down may result in a better smoke ring on the lean side, depending on the configuration of your smoker. Aaron Franklin suggests fat side up. Lately I am more partial to fat side up as it results in better looking slices at the end.
Step 4 - Foil Stage
After 4-5 hours, you should pull the brisket and wrap it with a double layer of aluminum foil. Optionally you can add a cup or two of beef broth. The purpose of the foil stage is to ensure that you don't oversmoke the brisket and it keeps the brisket moist. All the top experts do this. As an alternative to foil, you may want to use a disposable aluminum steamer pan (see section below).
After foiling, you should then return it to the heat. You can do it in your smoker, but that seems like a waste of pellets to me, since all you need now is heat, not smoke. I like to put it in my oven in the kitchen. Keep the temp at 225 degrees.
Cook the brisket for another 3-5 hours until the brisket reaches 195-205 degrees. Once it gets above 190 degrees, you should start checking for doneness with a toothpick, fork, thermapen, or some other kind of narrow probe. You should cook until the probe glides in like butter, with very little resistance. Don't let it get above 205 degrees. Total cook time to this point is generally around 9-10 hours.
Step 5 - Holding Stage
Once the brisket is done, take it out of the oven and let it sit uncovered for five minutes. This stops the cooking. Then turn the temp down to 160 degrees or so and hold it there for a few hours until you are ready to eat. You can hold for many hours this way, and the holding actually improves the flavor and texture of your brisket. During this stage, your brisket will continue to get more tender as the connective tissues is broken down. More details here:
http://www.npr.org/sections/thesalt/...eat-is-sublime
This stage is sometimes called the "faux cambro" or "foil-towel-cooler (FTC)" stage. If you want to free up your oven, you can wrap the foiled brisket in towels and place it in a cooler or place in a real cambro if you happen to own one. It will maintain the heat for several hours.
Step 6 - Cooling Down Stage
You should always pull out your brisket and let it sit on the counter for 30 minutes or so prior to slicing. This allows the fibers to relax and reabsorb the moisture. Aaron Franklin lets his sit for up to an hour and he recommends that you don't slice until you can touch it without burning your hand.
Step 7 - Slice and Serve
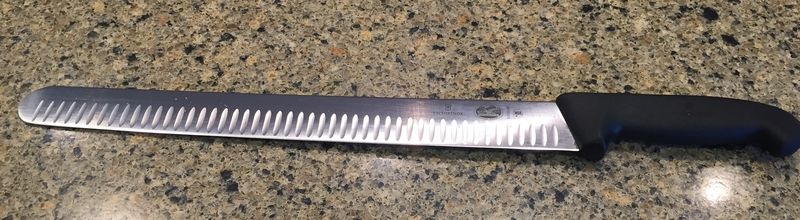
Slice your brisket against the grain in the flat muscle. When you get to the point, turn 90 degrees (i.e., "the Texas turn") and continue slicing. Or you can separate the flat and point muscle before slicing and slice both against the grain. There are tons of youtube videos on slicking brisket if you want to check them out. Slice right as you serve if you can. When someone wants seconds, slice off some more. This helps prevent the meat from drying out. Do not use an electric knife. It makes your meat fibers shaggy. Invest in a good quality slicing knife. I have one of these and I love it:
http://www.amazon.com/gp/product/B00...ilpage_o06_s00
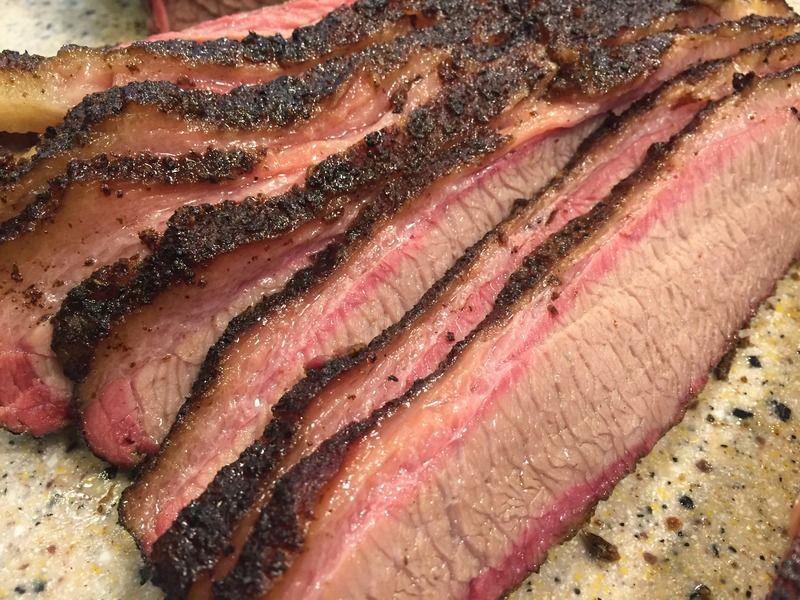
Slice your meat at 3/8-1/4 inches thick.
Final results:
Foil pans
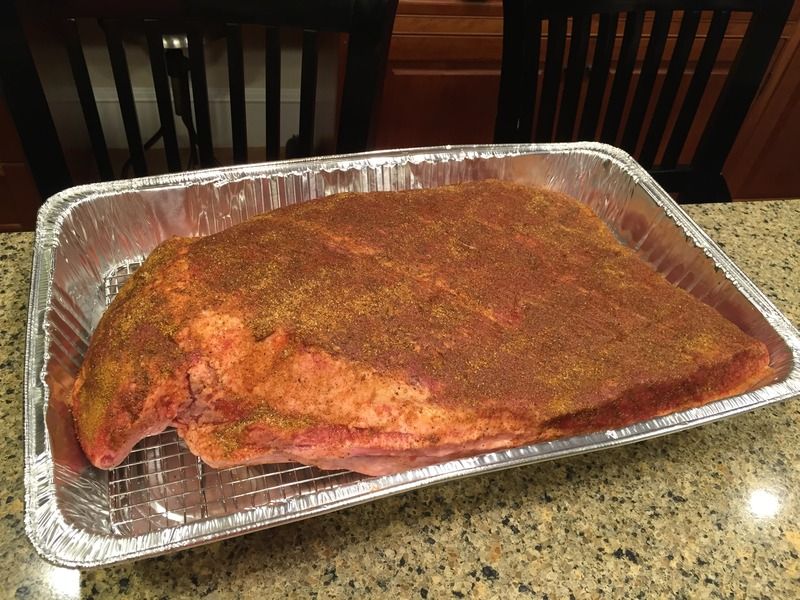
One nice trick for keeping things clean is to use a full-size foil steamer pan. You can buy them on Amazon:
http://www.amazon.com/gp/product/B00...ilpage_o08_s01
But they are much cheaper at Costco or Sam's Club (check your local store, varies by location). I also use a rack this size:
http://www.amazon.com/gp/product/B00...rch_detailpage
This fits right in the bottom of the pan. Or better yet, get two of these:
http://www.amazon.com/Heavy-duty-Coo...=cooling+racks
and they can double for use in half-size pans when you do pork butt.
Then, rather than putting the brisket right on the grill, you put it in the pan. This photo shows meat side up, but I am more partial to fat side up.
Then when you foil, you just put a sheet of foil over the top of the pan. Super easy and less cleanup. And the drippings are captured in the pan, but your meat doesn't get soggy.

Another option with the pan is to do the first 4-5 hour stage directly on the grill and then place the brisket in the pan when you foil the top. A little more cleanup that way, but you get better smoke penetration on the bottom. Most of the juices come out during the foil stage anyway.
Leftovers
If you have leftover meat, slice it and add some of the extra juice and vacuum seal. If you don't vacuum seal, the meat oxidizes and tastes funny after a day or so. Leftover brisket is terrific for sandwiches, quesadillas, and enchiladas. You can buy a good vacuum sealer at Costco or Amazon. Highly recommended. Can't imagine living without one of these.
http://www.amazon.com/FoodSaver-Vacu...=vacuum+sealer
Thermapen
If you don't already have one, I STRONGLY recommend you pick up a Thermapen temp probe. It provides instant accurate readings. I can't imagine cooking without one. They are made right here in Utah. You can order them on Amazon.com or directly from Thermaworks website.
LAST UPDATE: 9/21/15
=============================
This document describes my current technique for cooking brisket. I use the same basic method on both my Traeger wood pellet smoker and my Stumps gravity feed charcoal/wood chunk smoker. I am continually learning and tweaking my technique, but the basic method described below is pretty solid and results in consistently good smoked brisket. Brisket can be difficult to cook correctly and are often considered the most challenging cut among the typical bbq meats (pork butt, ribs, chicken, brisket), but it can be mastered and the results are wonderful.
Step 1 - Selection
First of all, you need to locate a good brisket. Some places sell only part of the brisket. A complete brisket is called a "packer". The narrower but thicker end is called the "point" and the thinner but broader end is called the "flat". The flat is more lean and the point is more fatty. At many places when you buy a brisket, you are only buying the flat. This happens quite a bit at Costco for example. I strongly recommend buying and cooking a complete packer. Without the full packer it is tough to keep the brisket moist. Dry tough briskets are no fun and are exactly what we are trying to avoid. If you buy a brisket that is less then 10 lbs, you probably have just the flat. A typical packer brisket is 12-17 lbs. Costco briskets:
It should also be noted that a brisket consists of two muscles. The main muscle is called the "flat". The other muscle is on top of the flat is the "point", and the fibers run at 90 degrees from the other muscle.
A common technique in brisket is to separate the point from the flat once the brisket is completely cooked and slice the flat, but cut the point into cubes which are then given some bbq sauce and some extra seasoning and thrown back on the grill to make "burnt ends". These little nuggets are awesome, but I generally leave everything together and just slice and serve the flat and point together. In my experience, the best part of the brisket in terms of flavor and tenderness is the combined flat and point on the end containing the point.
One additional thing to note about brisket is that there is a fatty side and a meaty side. I usually trim the fatty side down to about 1/4 inch of fat, but trim all of the fat and silver skin off the meaty side. The meaty side is where you are going to get most of your smoke penetration. Smoke does not penetrate fat. I like to leave the fat on the other side because if you trim both sides, you are likely to end up with a dry product.
When you pick out a brisket, try to get something with good marbling. If you can afford it, try a prime or wagyu brisket, but you can get excellent results with a good quality USDA Choice. You can buy full packers at Walmart, Sam's, Costco, and just about any butcher shop. They have two butcher shops in Lehi and there are several in Salt Lake Valley. There is a new meat distributor in Orem/Lindon called "Sunbow" and I hear they have good brisket.
Step 2 - Preparation
Next step is to prep the brisket. Here is a 16 lb brisket I did last year. Point on the left, flat on the right. Fat side is up.
First of all, there is a wedge of fat on the side between the flat and the point. It is not essential to do so, but I like to cut it out. This makes the thickness of the two sides more uniform and makes the meat cook more evenly. This one could have used a little more cutting (note the remaining fat at the top of the wedge).
Depending on the brisket, sometimes I will trim some fat away on the point end in an attempt to make the brisket more uniform in thickness. Trim away excess fat until you have about 1/4" fat on the fatty side.
Next I flip the brisket over and trim all of the silver skin and fat from the meaty side. When you are done it looks like this:
At this point you may want to consider injecting the brisket. This is an OPTIONAL step. You can get good results without injecting, but some argue that it gives you more consistent results over time. You can look up injection recipes on the web or you can use a mix (just add water). You can purchase injection mixes online or buy them from BBQ Pitstop in Lehi. One of the ingredients in an injection is phosphates, which help the meat retain moisture. You also need an injection needle which you can pick up at BBQ Pitstop for a few bucks. After injecting you should massage the brisket and wrap it up and let it sit in the fridge for an hour or two for the injection to absorb. Go ahead and try it, but I don't inject much anymore as I think it generally turns out fine without it.
After injecting (or not), the next step is to apply your rub. For brisket, I like to use a rub that is specifically designed for beef. A beef rub will be heavy on salt and savory flavors and not have so much sugar. Sugar is great for pork, but not for beef. My favorite brisket rub is called "Black Ops" and you can pick it up at BBQ Pitstop in Lehi or order online. I have also had good results with Plowboys Bovine rub. Or you can keep things simple and use a 50/50 mix of kosher salt and black pepper. This is what the famous BBQ chef Aaron Franklin does.
Before you apply the rub, be sure to wipe off all of the injection if necessary. Some people like to apply yellow mustard or olive oil to a brisket prior to rubbing to give the rub something to stick to. Sometimes I do this, sometimes I don't. Apply a liberal amount of rub to both sides (you can use less rub than this if you like).
At this point you can wrap the brisket in plastic wrap and throw it back in the fridge until you are ready to cook. But you can apply rub right before smoker. Leaving rub on too long may cause water to shed due to salt in the rub.
Step 3 - Smoker
The next step is to fire up the smoker and cook the brisket. There are two main strategies for cooking brisket: "low and slow" vs. "hot and fast". The following technique is more of a low and slow method. You should start cooking the brisket about 12-14 hours before you plan on eating. This will give your brisket plenty of time to cook and then rest prior to serving. You don't want all your guests to show up and learn that the meat won't be done for 2-3 hours.
I strongly recommend using OAK pellets or wood chunks (depending on your smoker type). If you don't have oak, hickory or something else would probably work OK. I am partial to oak because that is what they used in Austin - THE BRISKET CAPITAL OF THE WORLD.
Turn your brisket on to 225 degrees. Cook for about 4-5 hours. You can place the brisket fat-side down or fat side up. There are two schools of thought on this. Some think that having fat-side up results in a juicier brisket, but I think someone debunked this (no diff). Fat-side down may result in a better smoke ring on the lean side, depending on the configuration of your smoker. Aaron Franklin suggests fat side up. Lately I am more partial to fat side up as it results in better looking slices at the end.
Step 4 - Foil Stage
After 4-5 hours, you should pull the brisket and wrap it with a double layer of aluminum foil. Optionally you can add a cup or two of beef broth. The purpose of the foil stage is to ensure that you don't oversmoke the brisket and it keeps the brisket moist. All the top experts do this. As an alternative to foil, you may want to use a disposable aluminum steamer pan (see section below).
After foiling, you should then return it to the heat. You can do it in your smoker, but that seems like a waste of pellets to me, since all you need now is heat, not smoke. I like to put it in my oven in the kitchen. Keep the temp at 225 degrees.
Cook the brisket for another 3-5 hours until the brisket reaches 195-205 degrees. Once it gets above 190 degrees, you should start checking for doneness with a toothpick, fork, thermapen, or some other kind of narrow probe. You should cook until the probe glides in like butter, with very little resistance. Don't let it get above 205 degrees. Total cook time to this point is generally around 9-10 hours.
Step 5 - Holding Stage
Once the brisket is done, take it out of the oven and let it sit uncovered for five minutes. This stops the cooking. Then turn the temp down to 160 degrees or so and hold it there for a few hours until you are ready to eat. You can hold for many hours this way, and the holding actually improves the flavor and texture of your brisket. During this stage, your brisket will continue to get more tender as the connective tissues is broken down. More details here:
http://www.npr.org/sections/thesalt/...eat-is-sublime
This stage is sometimes called the "faux cambro" or "foil-towel-cooler (FTC)" stage. If you want to free up your oven, you can wrap the foiled brisket in towels and place it in a cooler or place in a real cambro if you happen to own one. It will maintain the heat for several hours.
Step 6 - Cooling Down Stage
You should always pull out your brisket and let it sit on the counter for 30 minutes or so prior to slicing. This allows the fibers to relax and reabsorb the moisture. Aaron Franklin lets his sit for up to an hour and he recommends that you don't slice until you can touch it without burning your hand.
Step 7 - Slice and Serve
Slice your brisket against the grain in the flat muscle. When you get to the point, turn 90 degrees (i.e., "the Texas turn") and continue slicing. Or you can separate the flat and point muscle before slicing and slice both against the grain. There are tons of youtube videos on slicking brisket if you want to check them out. Slice right as you serve if you can. When someone wants seconds, slice off some more. This helps prevent the meat from drying out. Do not use an electric knife. It makes your meat fibers shaggy. Invest in a good quality slicing knife. I have one of these and I love it:
http://www.amazon.com/gp/product/B00...ilpage_o06_s00
Slice your meat at 3/8-1/4 inches thick.
Final results:
Foil pans
One nice trick for keeping things clean is to use a full-size foil steamer pan. You can buy them on Amazon:
http://www.amazon.com/gp/product/B00...ilpage_o08_s01
But they are much cheaper at Costco or Sam's Club (check your local store, varies by location). I also use a rack this size:
http://www.amazon.com/gp/product/B00...rch_detailpage
This fits right in the bottom of the pan. Or better yet, get two of these:
http://www.amazon.com/Heavy-duty-Coo...=cooling+racks
and they can double for use in half-size pans when you do pork butt.
Then, rather than putting the brisket right on the grill, you put it in the pan. This photo shows meat side up, but I am more partial to fat side up.
Then when you foil, you just put a sheet of foil over the top of the pan. Super easy and less cleanup. And the drippings are captured in the pan, but your meat doesn't get soggy.
Another option with the pan is to do the first 4-5 hour stage directly on the grill and then place the brisket in the pan when you foil the top. A little more cleanup that way, but you get better smoke penetration on the bottom. Most of the juices come out during the foil stage anyway.
Leftovers
If you have leftover meat, slice it and add some of the extra juice and vacuum seal. If you don't vacuum seal, the meat oxidizes and tastes funny after a day or so. Leftover brisket is terrific for sandwiches, quesadillas, and enchiladas. You can buy a good vacuum sealer at Costco or Amazon. Highly recommended. Can't imagine living without one of these.
http://www.amazon.com/FoodSaver-Vacu...=vacuum+sealer
Thermapen
If you don't already have one, I STRONGLY recommend you pick up a Thermapen temp probe. It provides instant accurate readings. I can't imagine cooking without one. They are made right here in Utah. You can order them on Amazon.com or directly from Thermaworks website.

 . Apparently I hadn't set the alarm correctly so it never went off. We just pulled the meat and doused it in BBQ sauce.

 .
.
Comment